
Billing staff use this procedure when an insurer’s EOB PDF is uploaded or an electronic remittance advice (ERA) arrives from Stedi. Review the payer response, correct any errors, apply the insurance payment, and create a patient invoice only for the verified remaining balance.
📚 Resources Needed
Your authorized besa EHR account with access to Billing, Claims, and Invoices.
The correct patient, encounter, and claim, plus the insurer’s EOB PDF or the Stedi remittance details.
Existing insurance payments, copays, other patient payments, and invoices for the encounter.
Watch the narrated EOB walkthrough and view all 17 screens
The walkthrough runs 3 minutes 25 seconds and uses fictional patients and amounts. Sign in if prompted.
✅ Before You Start
Confirm the patient, encounter, date of service, payer, and claim before uploading or applying anything.
Confirm that EOB reading and the Stedi review workflow are available for your clinic. If the screen differs, contact Support before proceeding.
Check for an existing payment or invoice. Do not repeat an action whose result is unclear.
Stop for a wrong patient, unexplained totals, or an unauthorized charge. Keep patient identifiers, EOB contents, and payment details out of ordinary support screenshots.
🚀 Tips & Tricks
Uploaded EOB: you choose the PDF; Besa reads it. Stedi ERA: the payer response arrives electronically; no PDF upload is needed. Both then use Review EOB.
Processed means a payer response is waiting for billing review in this workflow. Applying records the confirmed payment and claim status. Reconcile retains its separate meaning for payer money reported but not received.
Applying an insurance payment and sending the patient invoice are separate actions. Review EOB does not itself send an invoice. Saving the invoice can send it or collect payment through the selected payment method.
📘 Instructions
When an EOB PDF Is Uploaded
Step 1 Open the claim and upload the EOB
Open Billing → Claims. Find the correct claim, open its row action menu, and select Edit Claim. In Edit A Claim, locate EOB and choose or drop the insurer’s PDF. The file uploads immediately; confirm the correct file name. The field accepts PDF, PNG, and JPG up to 15MB.
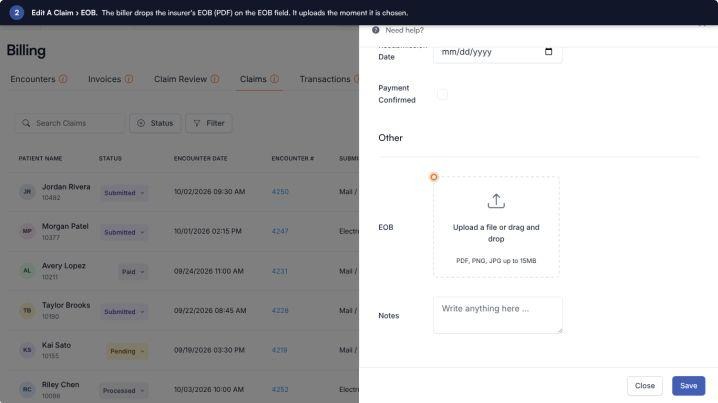
Choose the insurer’s PDF in the EOB field.
Step 2 Wait for the reading result
The EOB line shows Reading EOB… and then Ready To Review. The claim moves to Processed after the read. Open Review EOB from the claim or its row menu, then continue with the shared review steps. Closing the form does not undo an upload that has already completed.
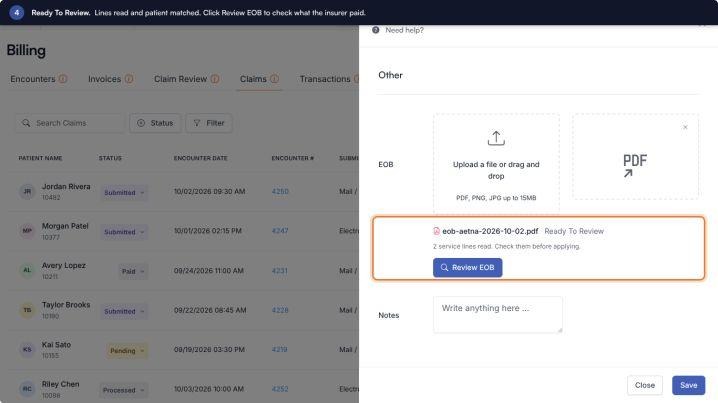
Ready To Review means the extracted response is available to check.
When an ERA Arrives From Stedi
Step 3 Find the electronic response
Open Billing → Claims and locate the matching electronic claim. When Stedi’s ERA is recorded in the review workflow, the claim moves to Processed automatically. Do not upload the same response as a PDF or manually enter the insurance payment before checking the existing response.
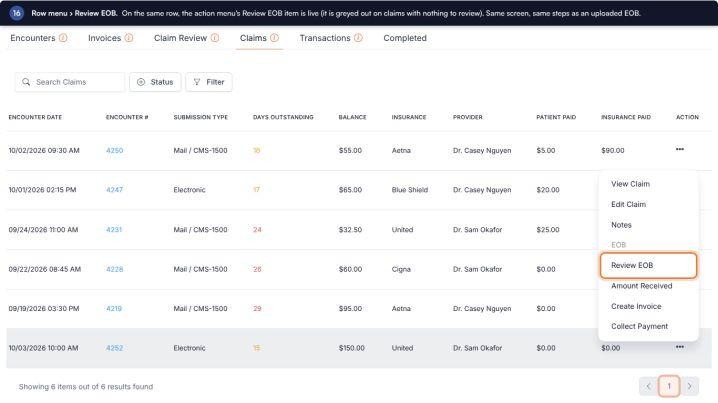
Use the claim’s row action menu to open Review EOB.
Step 4 Confirm the ERA source
Select Review EOB from the row action menu. Confirm that the header says Electronic Remittance and that the patient, payer, payer claim number, and date of service match the intended claim. Continue with the same line review, Apply Insurance Payment, and invoice steps used for an uploaded EOB.
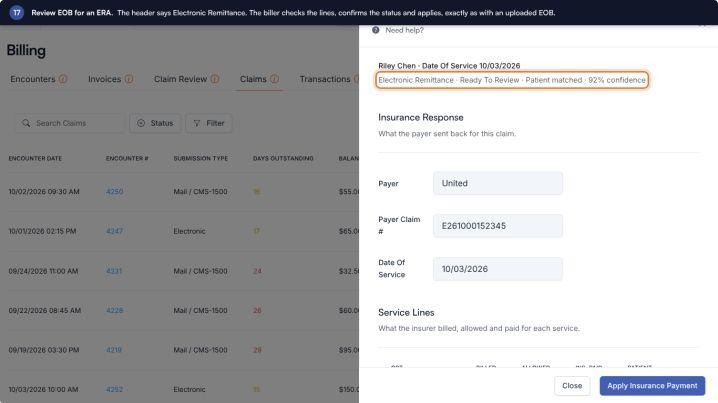
Electronic Remittance identifies the Stedi response.
Review the Payer Response
Step 5 Check every service line
For an uploaded PDF, use Open EOB to compare the extracted data with the original. For an ERA, compare with the payer’s remittance details. Review patient matching and any warnings, then each CPT, billed amount, allowed amount, insurance payment, adjustment, and patient responsibility. Check totals and payments already collected.
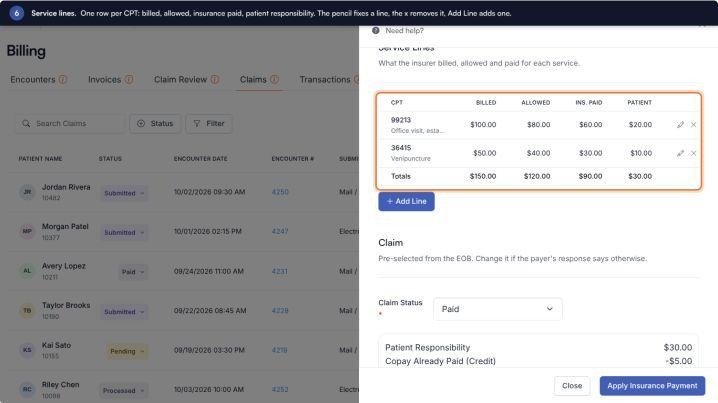
Compare the service lines with the insurer’s response.
Step 6 Correct a line and verify the saved result
Select the pencil on the affected row. Correct the fields against the source, then select Save Line. Confirm the row and totals update; reopen the line if needed to verify the correction. Cancel leaves the line unchanged. Use Add Line for a missing service or the × to remove an incorrect row, confirming any removal prompt. Do not alter values merely to clear a warning.
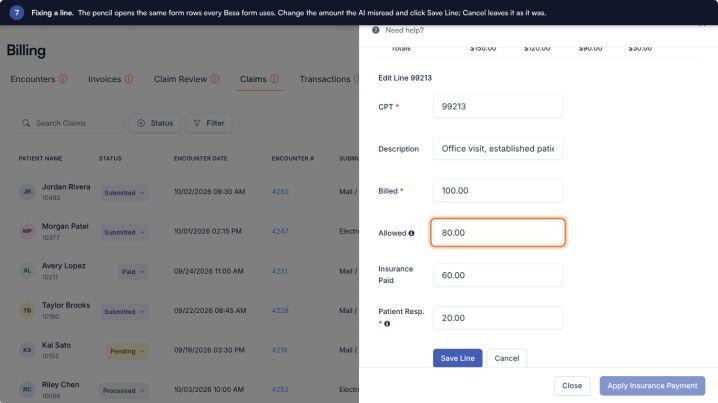
Save Line records a correction; Cancel leaves the line unchanged.
Apply the Insurance Payment
Step 7 Confirm the claim status and amount due
Review the pre-selected Claim Status and change it only when the payer response supports the change. Check Insurance Paid, Patient Responsibility, Copay Already Paid, and Amount Due. Resolve wrong-patient or unbalanced-line errors before continuing. When everything is correct, select Apply Insurance Payment.
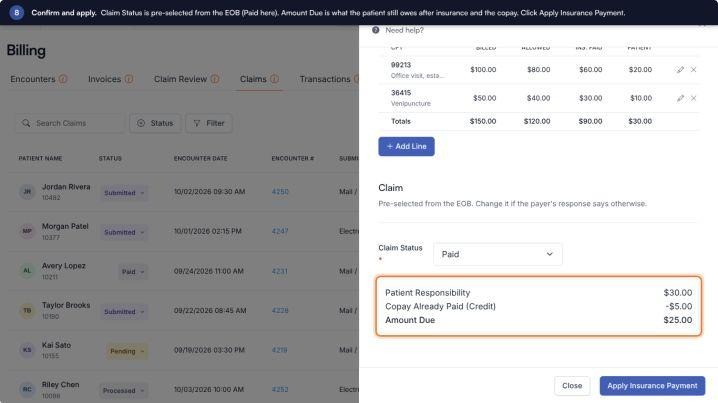
Review the selected claim status and remaining patient balance before Apply.
Step 8 Verify the payment and choose the next action
Confirm the application result. Reopen the claim and check the saved claim status and Insurance Paid amount. When a balance remains, select Create Invoice in the confirmation box to open the pre-filled invoice. Not Now closes the prompt; the applied payment remains recorded. For a zero balance, no patient invoice is needed.
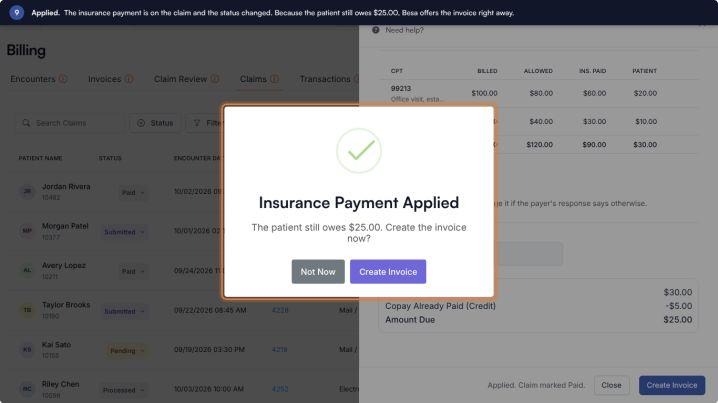
Create Invoice opens the draft; Not Now leaves invoicing for later.
Review and Save the Patient Invoice
Step 9 Review the pre-filled invoice items
In Create An Invoice, confirm the patient and encounter. Under Scope Of Work, review each service at its allowed amount. Remove an item only when appropriate. If an authorized extra item is needed, enter Name and Price and select Add New. Recheck the total after every change. If you chose Not Now earlier, first check Invoices, then use the claim’s Create Invoice action only if no invoice already exists.
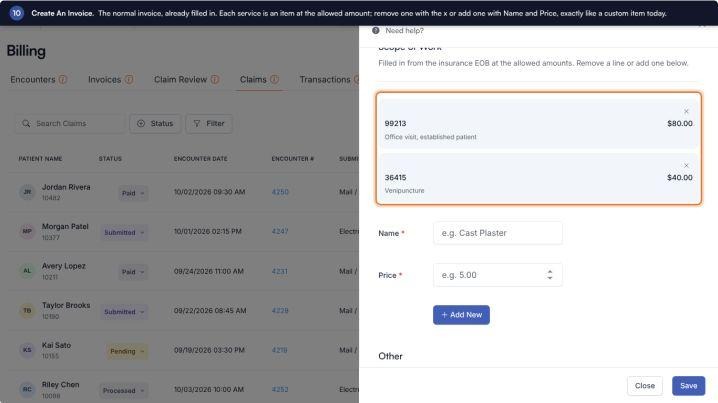
The invoice starts with the EOB service items at their allowed amounts.
Step 10 Check credits and payment details before Save
Verify Invoice Items less Insurance Paid and Copay Already Paid equals Amount Due. Example: $120.00 − $90.00 − $5.00 = $25.00. Confirm the payment method and note, and be ready for the selected payment action before Save. Use Close if anything is incorrect. After saving, verify the invoice in Invoices with the correct patient, amount, and status before repeating any action.
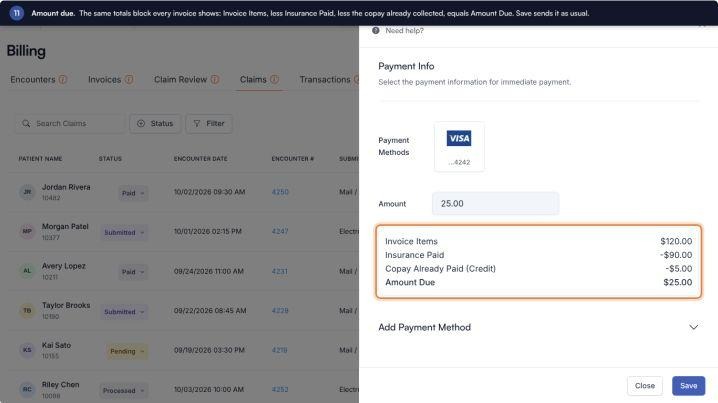
Confirm the final Amount Due and payment method before saving.
🛠 Troubleshooting
Reading takes longer than expected. If Reading EOB… continues or you see Still reading. Reopen the claim in a minute., wait a minute and reopen the claim once. Check for the read before uploading again. If it remains stuck, contact Support with the time, screen name, state text, and a sanitized screenshot.
Could Not Read or Extraction Off. For Could Not Read, confirm that the file is readable and supported, then use Try Again once. If it fails again, stop and contact Support. Extraction Off means the file can be stored without being automatically read; ask Support to confirm feature availability rather than repeatedly uploading.
Review EOB is unavailable for an ERA. Check the correct claim and whether the electronic response has arrived. Refresh once. If the response is expected but review remains unavailable, contact Support. Do not upload a duplicate PDF or create a separate payment to force the workflow.
Not Read on an older file. Select Read EOB once and wait for the reading result. This starts reading the already attached file; there is no need to upload the same PDF again.
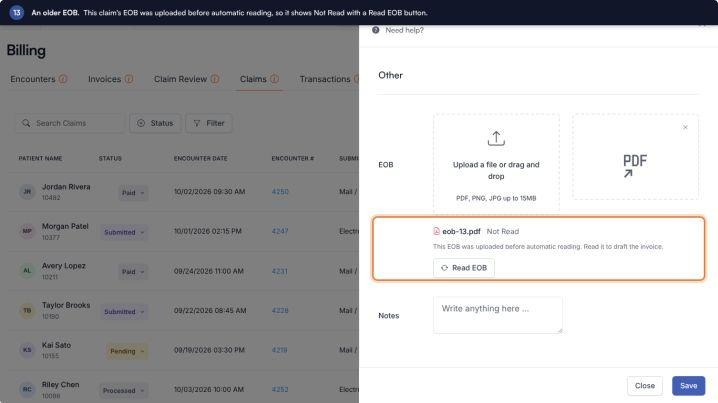
Read EOB starts reading an older attached file.
Wrong Patient or blocked Apply. Stop. Confirm the patient and source document. For an uploaded EOB, attach the correct file to the correct claim and review the new read. For an ERA mismatch or unexplained line imbalance, contact Support. Never change patient information or amounts simply to bypass the check.
Apply or invoice Save has an unclear result. Reopen Claims and Invoices and check the persisted payment, status, and invoice before retrying. If the result is still unclear, make no further apply or invoice attempts until Support investigates. A delayed response does not prove that the action failed.
What to send Support. Provide the workflow used (PDF upload or Stedi ERA), screen name, approximate time and time zone, exact error or state text, and steps already tried. Use an approved secure channel if record identification is needed. Remove patient identifiers, clinical details, payment details, and credentials from ordinary screenshots and messages.
✅ Completion Check
The correct patient, payer, claim, encounter, and date of service were confirmed.
The source is correct: Uploaded EOB for the attached document or Electronic Remittance for the Stedi response.
Every service line, warning, adjustment, and total was reviewed against the payer response; corrections were saved and checked.
The applied claim status and Insurance Paid amount remain correct after reopening the claim.
Existing patient payments were credited once, and Amount Due matches the verified remaining balance.
If an invoice was needed, one correct invoice is visible in Invoices and its amount and status were checked.
If no invoice was needed or invoicing was deferred, that outcome is clear and any follow-up is assigned.
No duplicate payment, invoice, or patient charge was created.
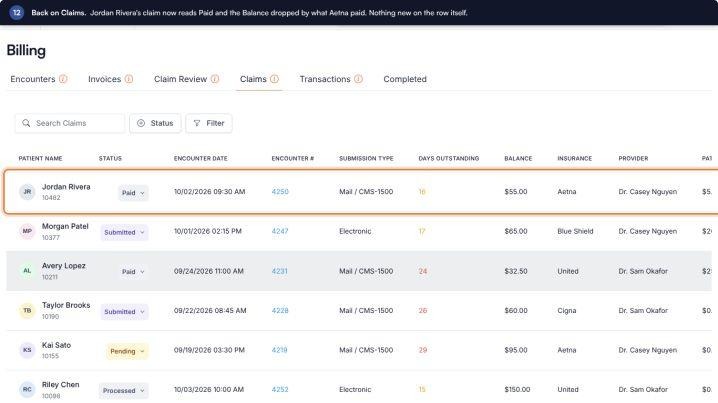
Reopen Claims to verify the saved claim status.
Comments (0)