
Purpose
Use this SOP when a team member is helping a patient navigate the Besa Patient Intake App. It covers account setup, reviewing patient information, completing each check-in section, reviewing the copay and payment method, and confirming that the visit is registered. The task is complete only when the app shows Check-In Complete and the patient selects Done.
Resources Needed
The patient’s intake or check-in link, or an active private kiosk session.
The correct patient and visit information.
The patient’s legal name, date of birth, phone number, current address, and email address when available.
A clear patient photo, insurance card, current medical history, and an approved payment method when requested by the app.
Access to the approved Support channel if the patient cannot complete a step safely.
Before You Start
Confirm the correct patient and visit before entering or changing information. Do not create a second account or check-in session for the same patient unless Support confirms that it is necessary.
Ask the patient’s permission before viewing or entering personal, insurance, medical, or payment information. Use a private screen and protect the patient’s information from other people nearby.
Let the patient review and approve information before it is submitted. Do not guess, sign a consent for the patient, or choose an answer on the patient’s behalf unless you are authorized to do so.
Never place a complete card number, security code, password, detailed medical history, or insurance identifier in a screenshot, note, chat, or Support request.
Asterisks identify required fields. If information is incorrect, incomplete, unauthorized, or unclear, stop and correct it before continuing.
Tips and Key Points
Creating a patient account allows saved information to be pre-filled during future visits. Use the patient’s existing account when one already exists.
The Check-In Progress bar shows overall progress. Orange Action Needed items are unfinished. Green Done · Tap to Review items are complete and can be reopened for review.
If a photo has not been uploaded, the app may show the patient’s initials. Select Edit Photo or Upload Patient Photo when a current photo is required.
The copay amount comes from the patient’s coverage and may be $0.00 or another amount. Confirm the displayed amount with the patient before entering or using a payment method.
Selecting Save or reaching 100% does not by itself prove that check-in finished. Verify Check-In Complete, then select Done to close the private session.
Instructions
Step 1 Open the Correct Check In
Open the patient’s intake or check-in link, or begin the session on the approved kiosk device.
Confirm the patient’s full name and visit. If the wrong patient appears, select Back or Log Out and stop. Do not edit the displayed record.
If the patient already has an account, use the existing sign-in or check-in path. If the patient does not have an account and wants saved information available for future visits, select Create Account.
Step 2 Create the Patient Account When Needed
On Create Your Patient Account, select Upload Patient Photo and follow the on-screen prompt. Use a clear, current photo. If a photo is not added and the app allows the patient to continue, initials may appear in the profile circle.
Enter the patient’s First Name, Last Name, and Date Of Birth exactly as the patient confirms them.
Select the patient’s displayed Sex option. If the available choices do not represent the information the patient needs recorded, stop and ask the appropriate staff member or Support rather than guessing.
Enter the current Street Address, City, State, and ZIP Code. Review all required fields marked with an asterisk.
Submit the account information once. Wait for the app to return to check-in. Do not select the submit control repeatedly while the page is processing.
Step 3 Review the Check In Dashboard
Review the patient name in the Welcome banner and the percentage in Check-In Progress.
Review the displayed Copay. Explain that the amount is associated with the patient’s coverage and must be reviewed with the payment method later in the workflow.
Select the first section labeled Action Needed. Completed sections show a green check and Done · Tap to Review.
Step 4 Review Patient Information
Open Patient Information.
Confirm First Name, Last Name, Date Of Birth, and Gender. Update only information the patient confirms is current.
Confirm Phone, Email when available, Street Address, Address Line 2 when applicable, City, State, and ZIP Code.
Select Edit Photo if the patient needs to add or replace a profile photo. If no photo is present, verify that the initials shown belong to the correct patient.
Save once, wait for processing, and return to the check-in dashboard. Confirm Patient Information now shows Done · Tap to Review.
Step 5 Complete Sign Consents
Open Sign Consents and let the patient read each consent before signing.
Answer questions only by explaining the screen or locating the requested information. Do not interpret a consent, recommend an answer, or sign for the patient unless your role specifically authorizes it.
Confirm the patient is satisfied with the selected consent choices, then submit once.
Return to the dashboard and confirm Sign Consents shows Done · Tap to Review.
Step 6 Upload Insurance
Open Upload Insurance and follow the prompts for the patient’s coverage.
Use the current insurance card. Make sure the image is readable, all requested sides are included, and important text is not cut off or covered by glare.
Before saving, confirm the uploaded image belongs to the correct patient. Do not upload another patient’s card or an unrelated document.
Save once and confirm Upload Insurance shows Done · Tap to Review.
Step 7 Complete Medical History
Open Medical History and review each question with the patient.
Enter current, accurate information. Do not guess about medications, allergies, conditions, procedures, or dates.
If the patient is uncertain about clinically important information, pause and ask the appropriate clinical team member how to proceed.
Submit once and confirm Medical History shows Done · Tap to Review.
Step 8 Review the Copay and Add a Payment Method
Open Add Payment Method and review the displayed copay with the patient. Treat $0.00 as a valid amount and verify every amount to the cent.
Use only the payment method the patient approves. The patient should enter complete card details directly into the secure payment fields whenever possible.
Review the amount and payment method before submitting. Select the payment or save control once and wait for a result.
If the result is unclear, do not submit again until the first attempt has been checked. A repeated attempt could create a duplicate authorization or charge.
Return to the dashboard and confirm Add Payment Method shows Done · Tap to Review.
Step 9 Review and Finish the Check In
Confirm Patient Information, Sign Consents, Upload Insurance, Medical History, and Add Payment Method each show a green check and Done · Tap to Review.
Confirm Check-In Progress shows 100% Completed.
Scroll to Check-In Complete and confirm the message says the visit is registered.
Select Done to finish the private kiosk session. If the device remains on a patient page, select Log Out before the next patient uses it.
Step 10 Update Saved Information Later
From the check-in page, select Patient Profile.
Review the saved personal and contact information and update only items the patient confirms have changed.
Use Edit Photo to replace the profile image. If no image is present, confirm the displayed initials match the patient.
Save the changes, verify they remain displayed, and select Back to return to check-in.
Create the Patient Account
Use this screen only when the patient does not already have an account and wants information saved for future visits.
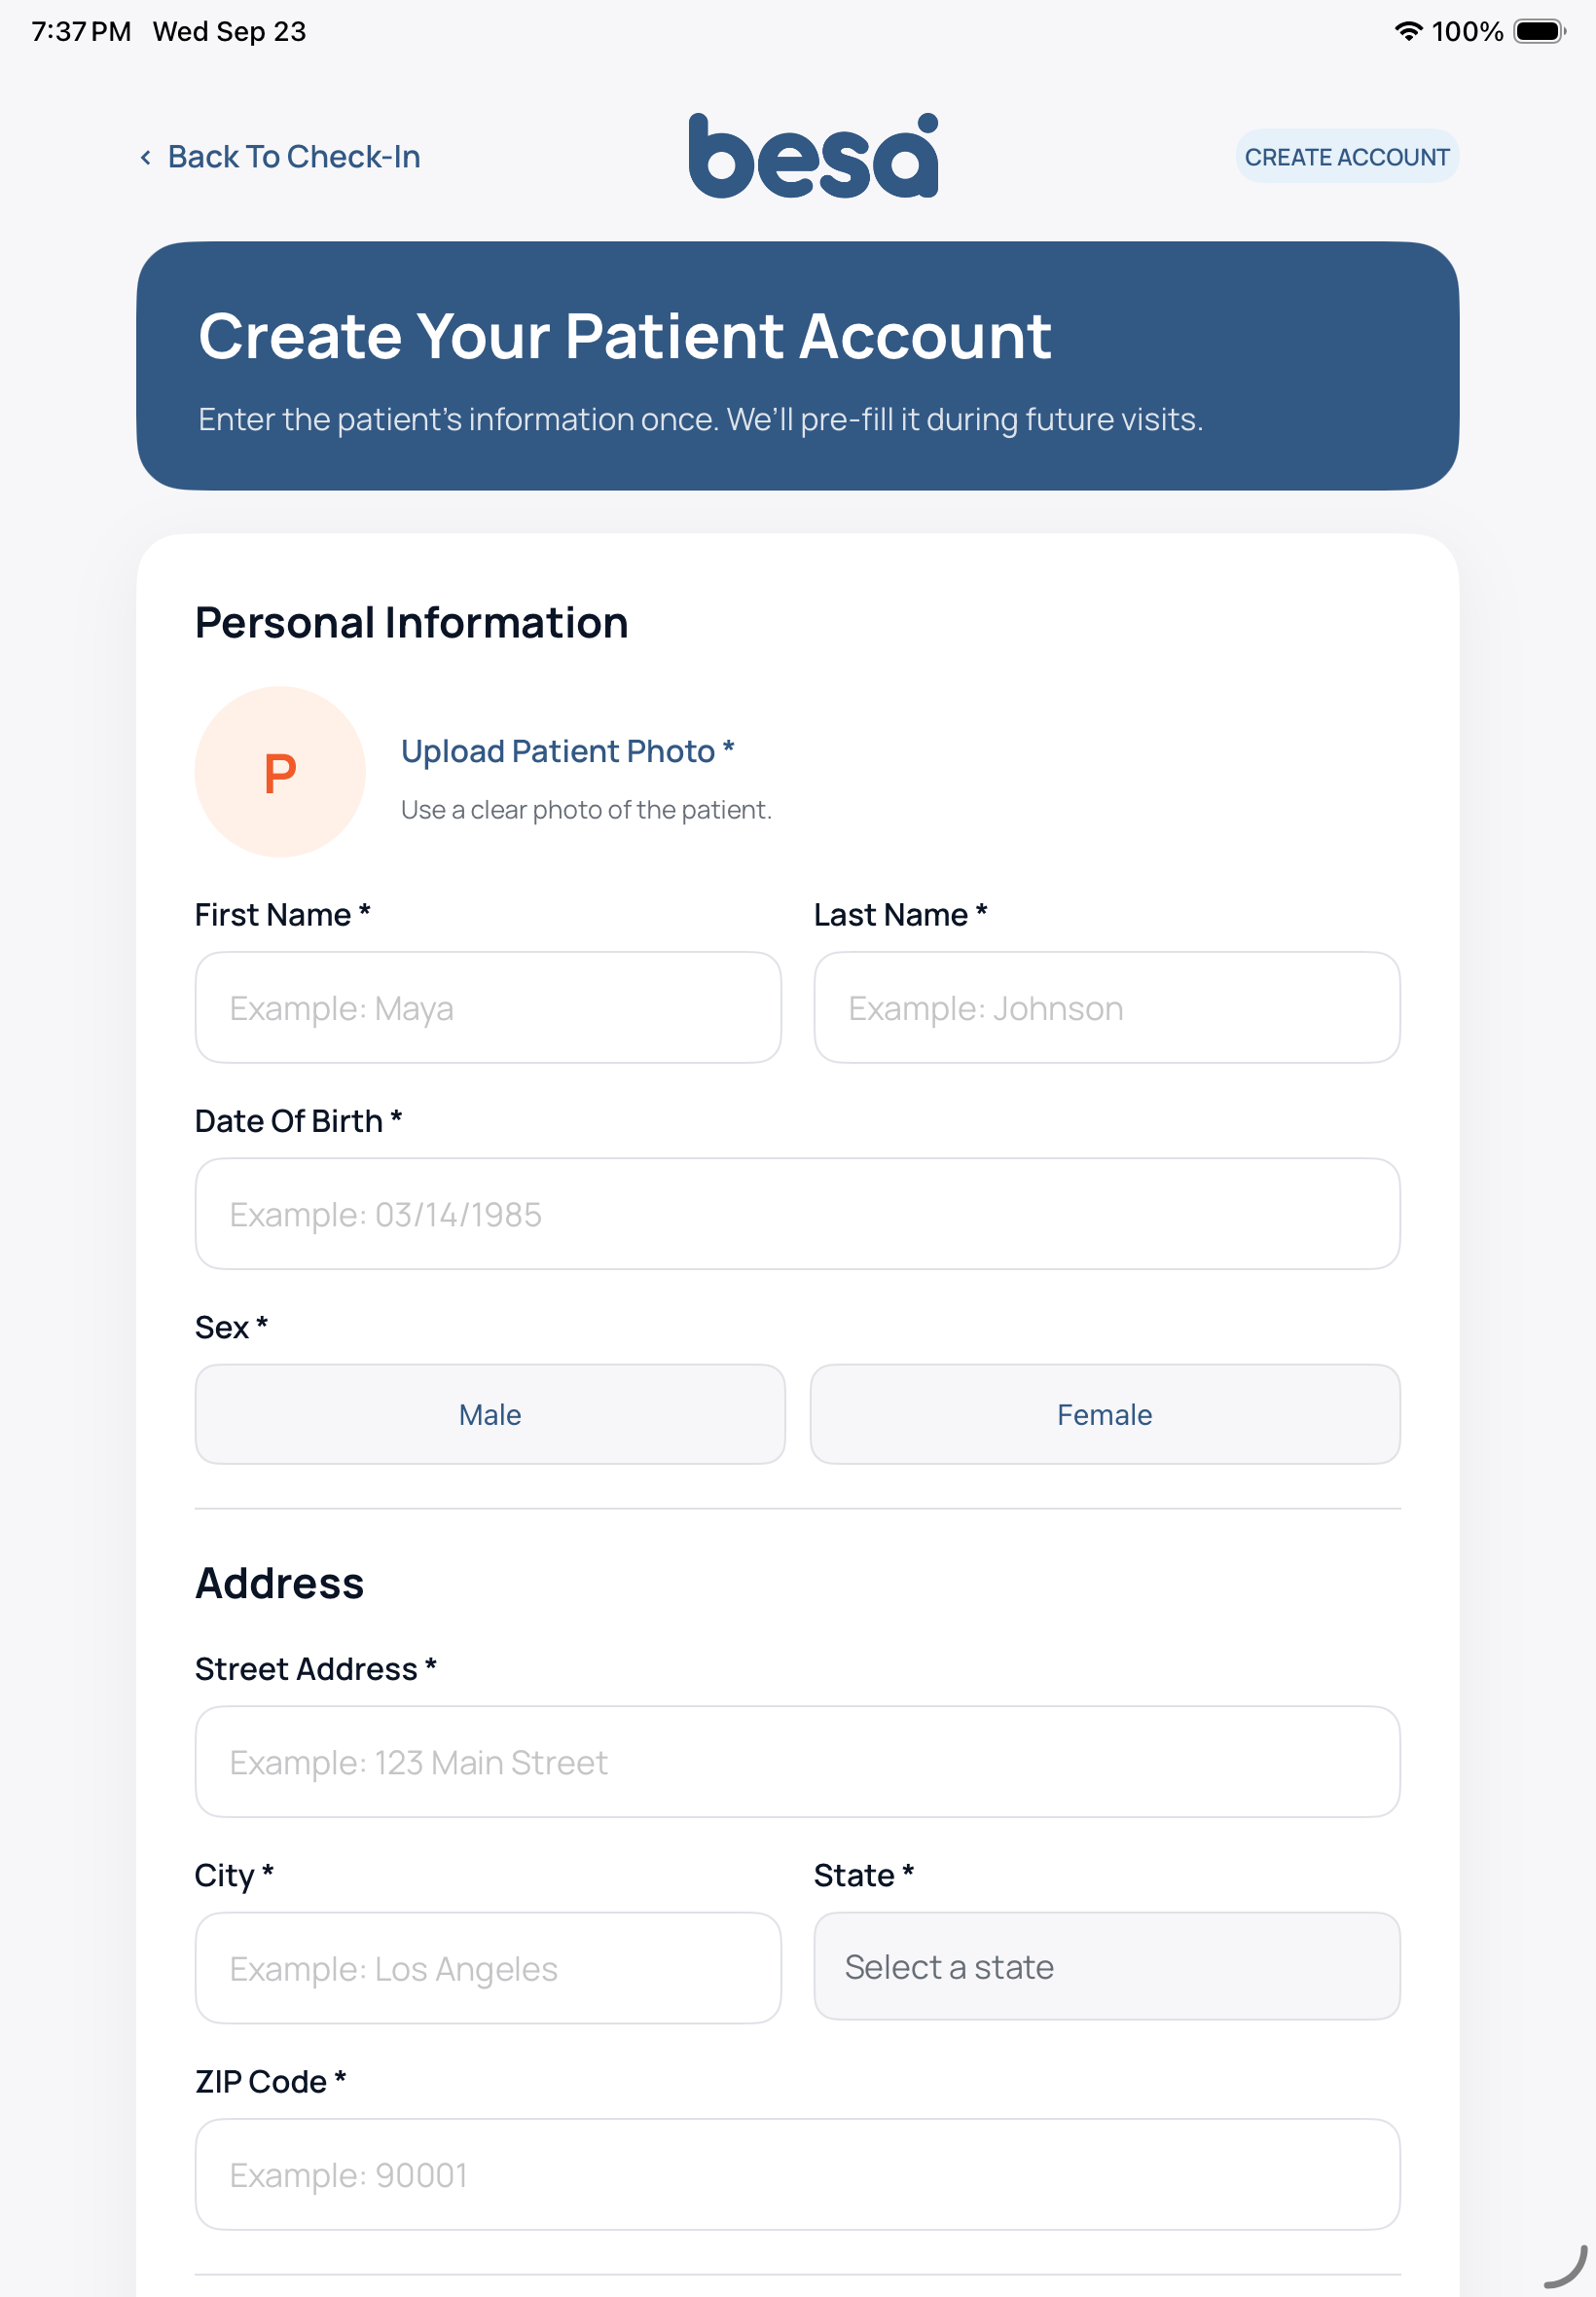
Figure 1. Create Your Patient Account shows the required profile and address fields.
Use Check In Progress
The dashboard helps staff and patients identify the first unfinished section and distinguish Action Needed from completed items.
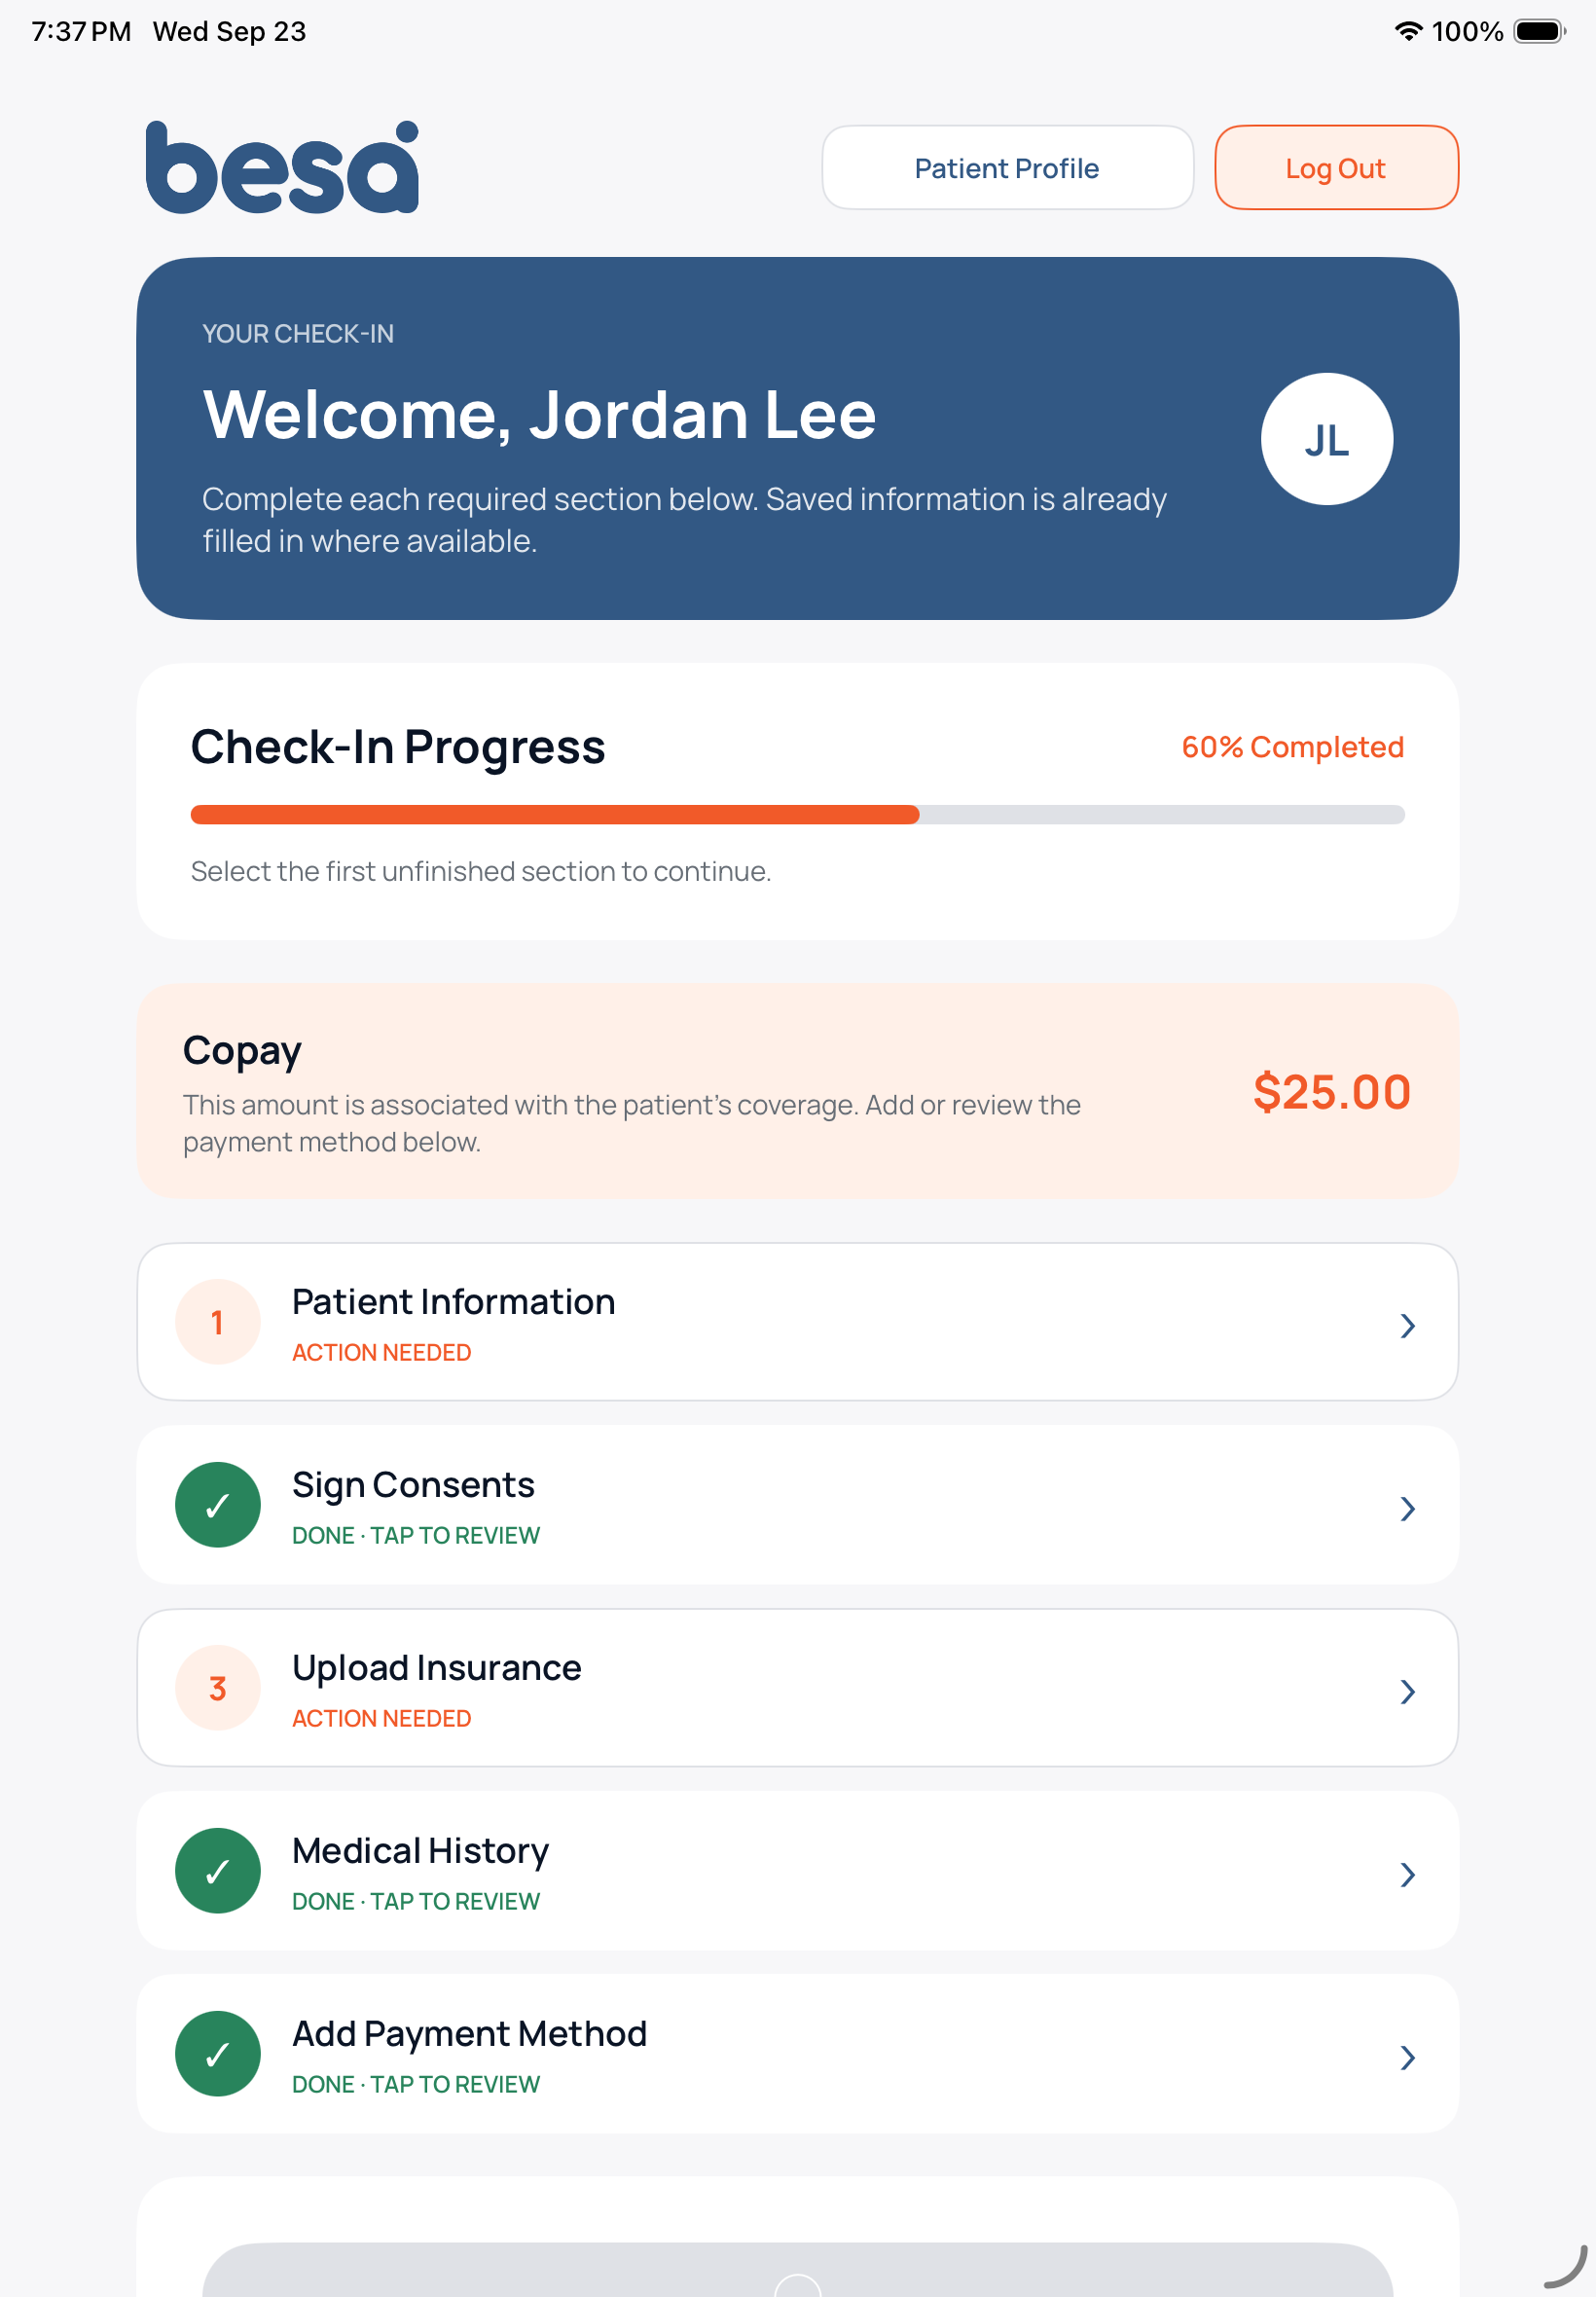
Figure 2. Select the first Action Needed item; green checks identify completed sections.
Review Patient Information
Confirm saved information with the patient and update only details that have changed. Required fields are marked with an asterisk.
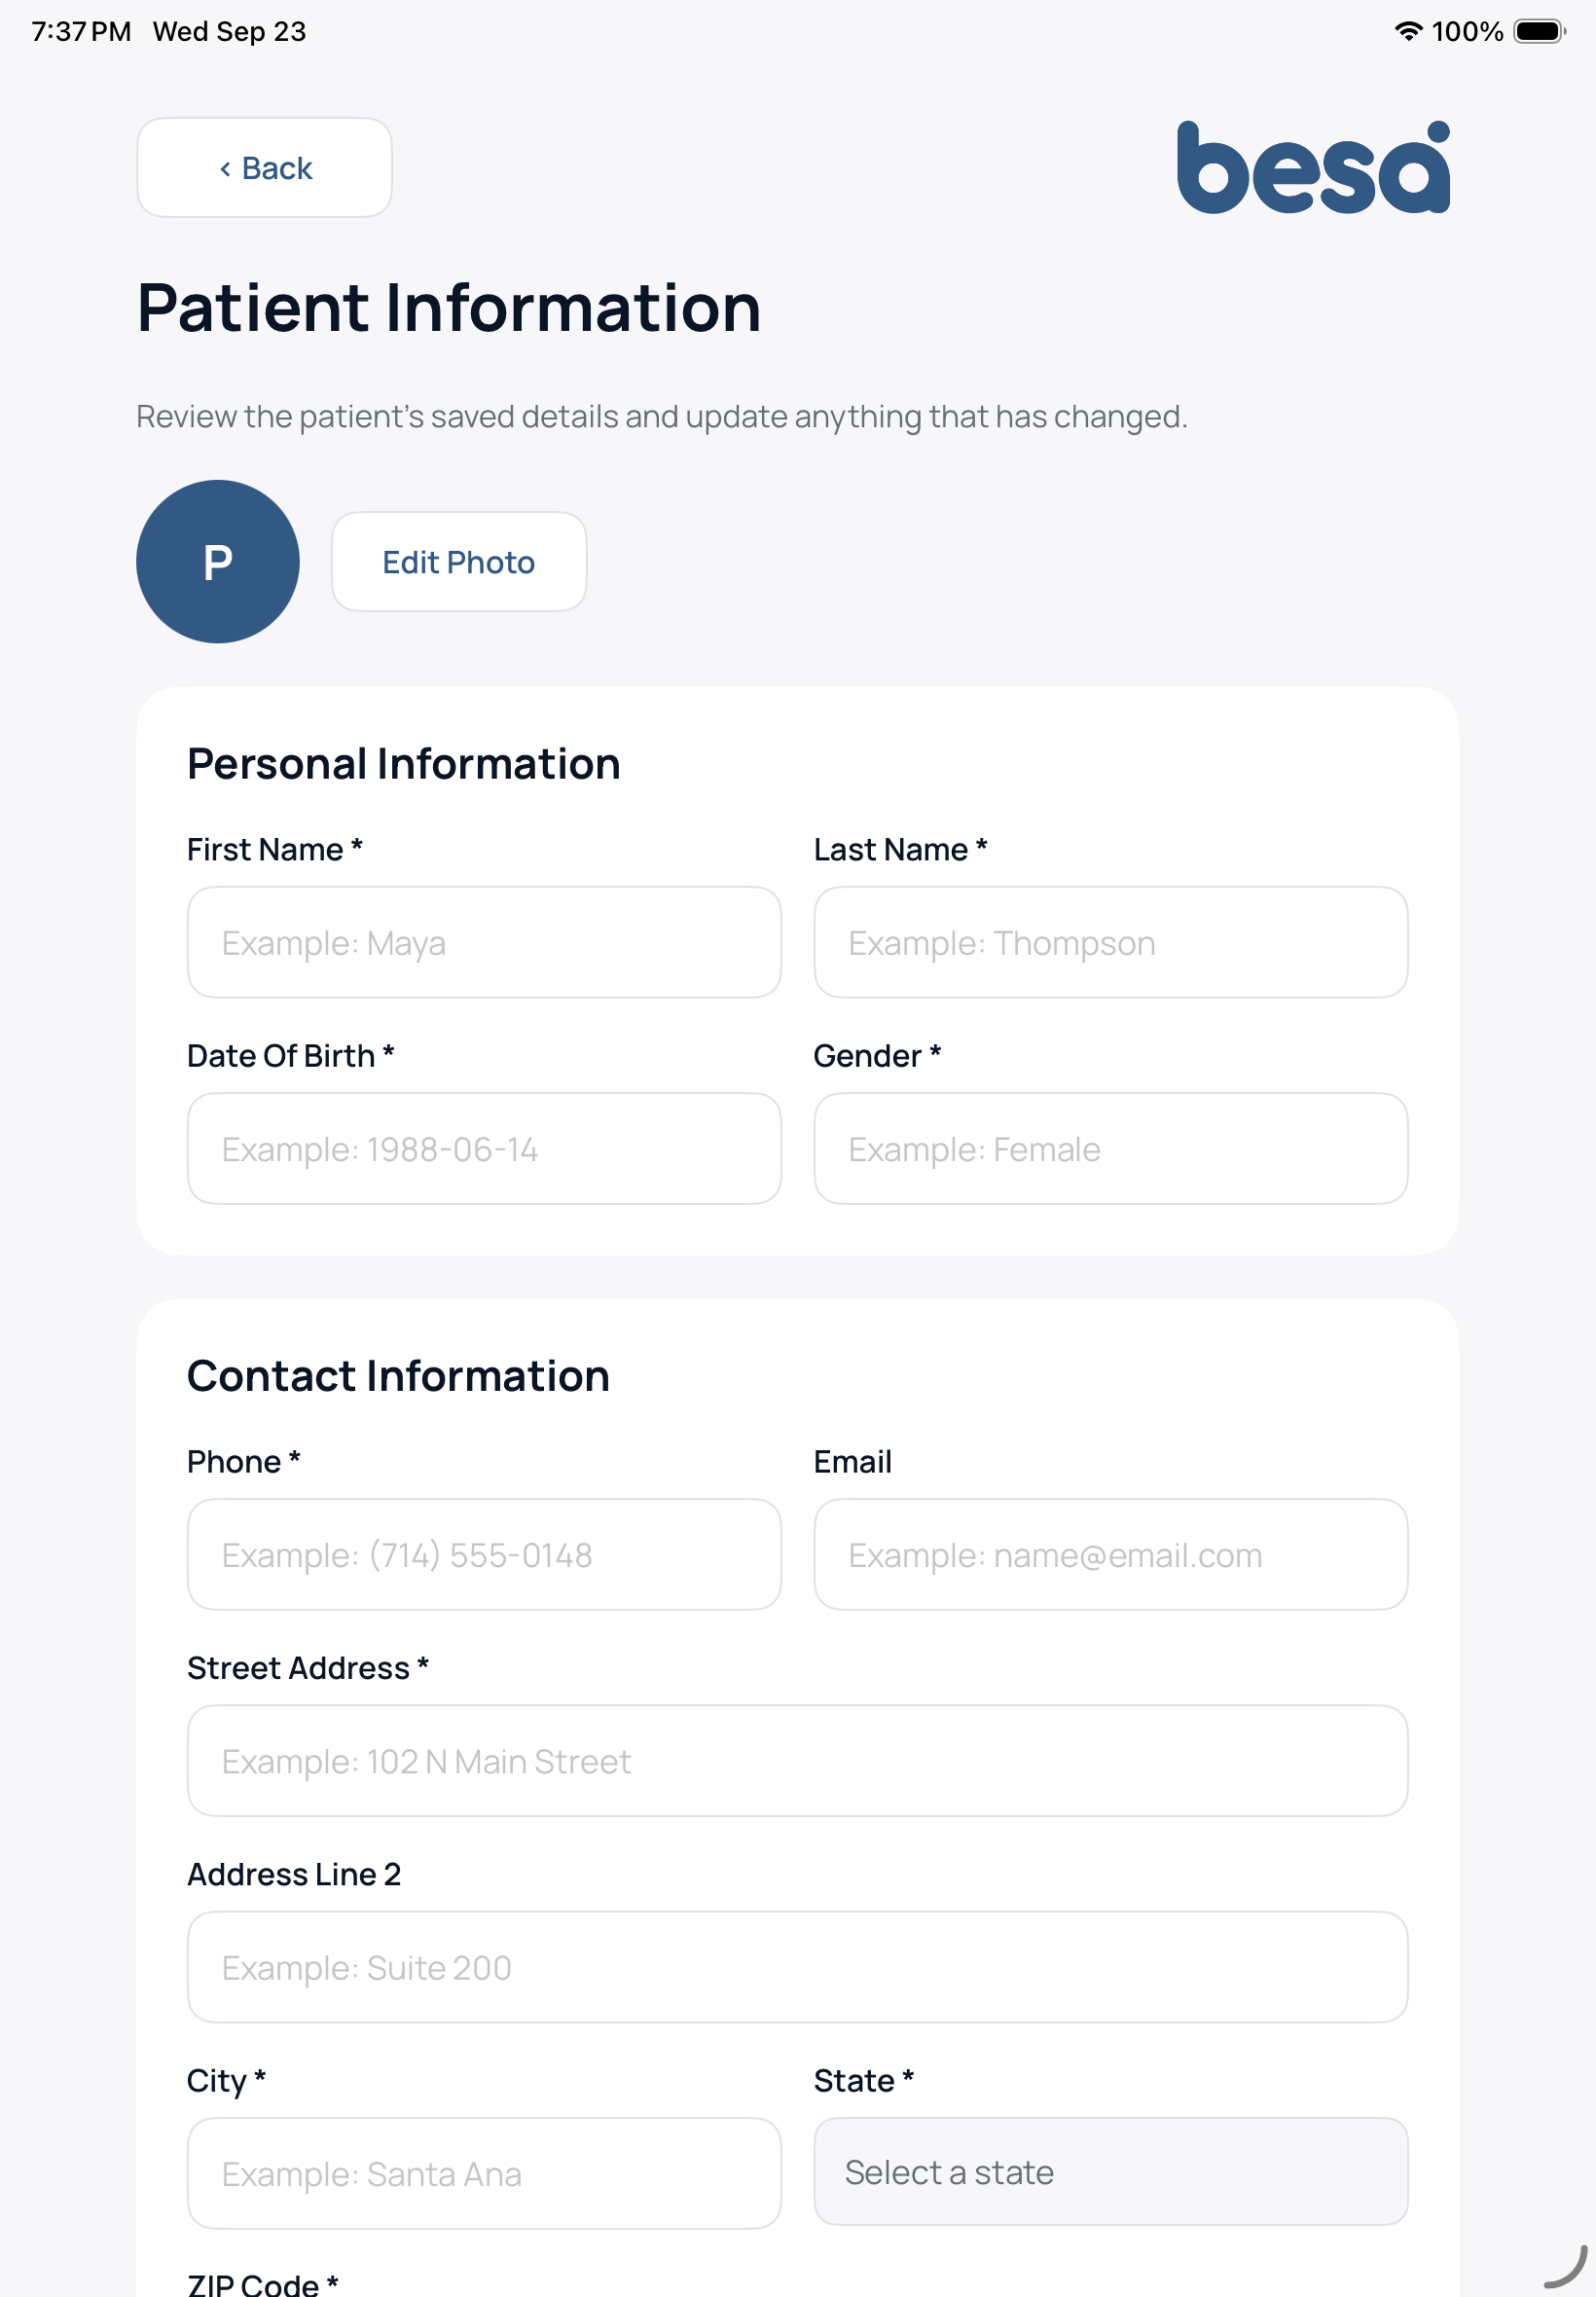
Figure 3. Patient Information includes personal details, contact information, address, and photo controls.
Confirm Check In Complete
Do not end the session based only on the progress percentage. Verify the completion message and select Done.
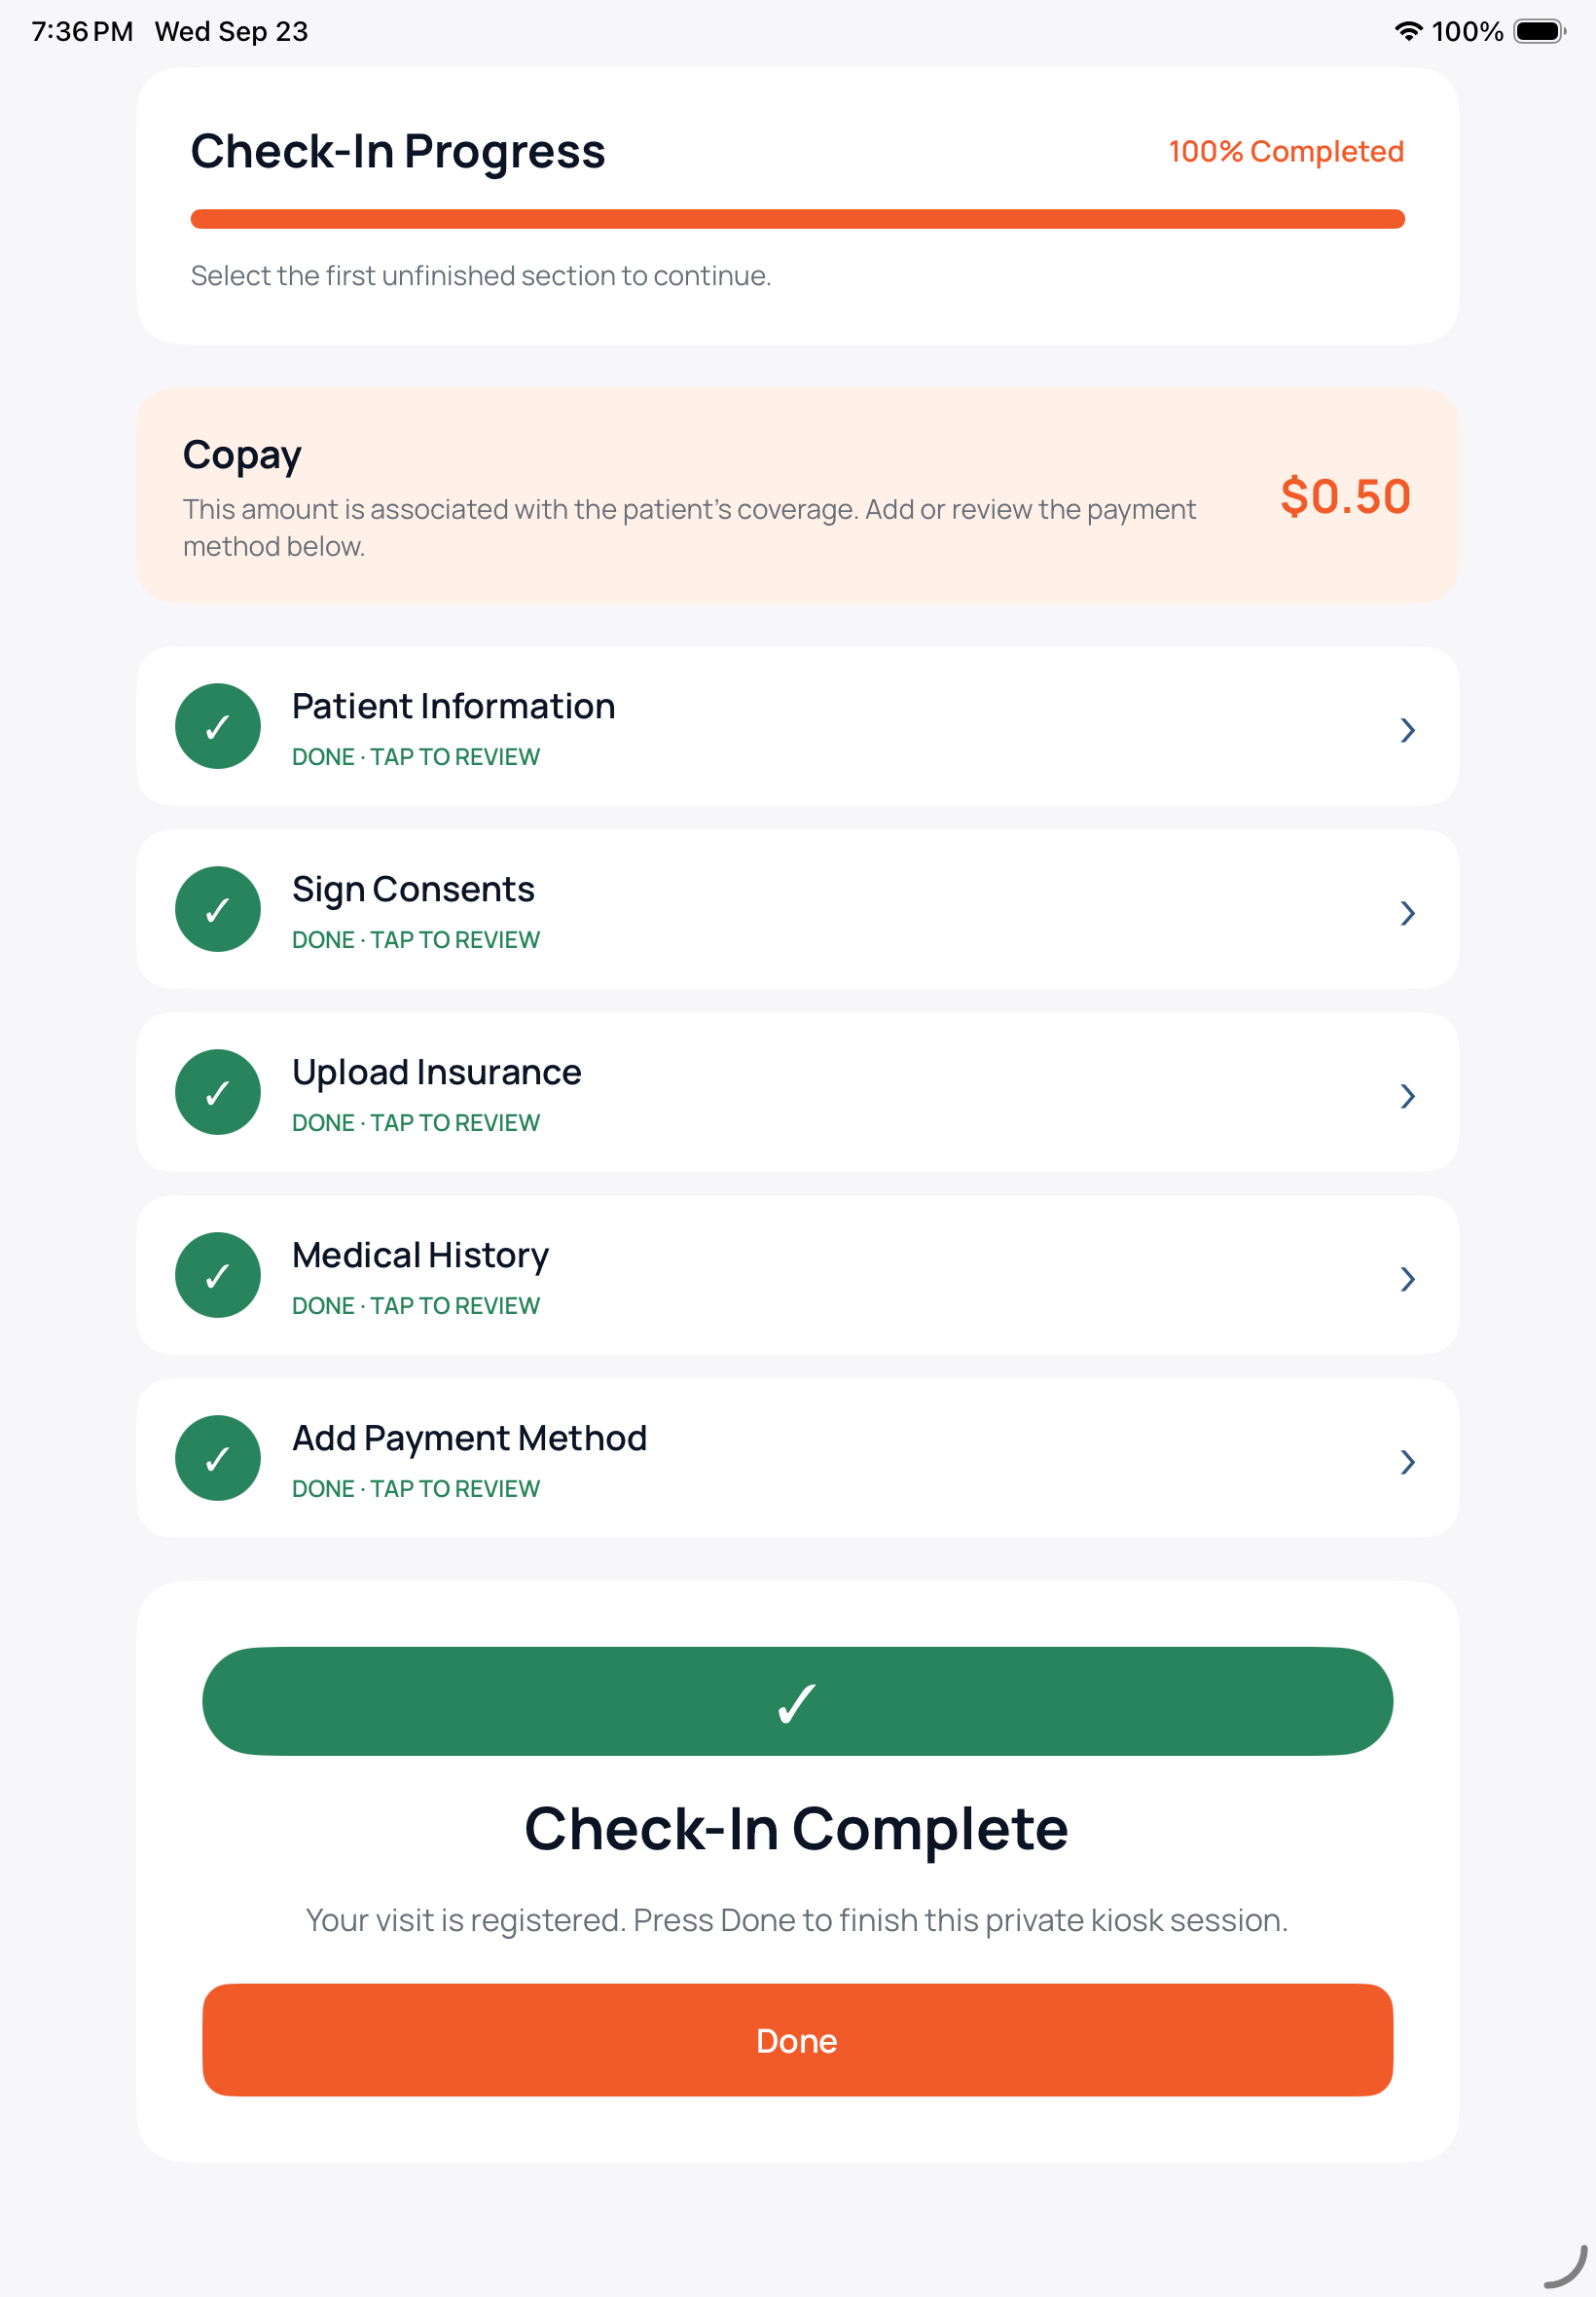
Figure 4. Verify Check-In Complete, then select Done to finish the private session.
Troubleshooting
The wrong patient or visit appears
Select Back or Log Out and stop. Do not change the displayed patient’s information. Reopen the correct link or ask the responsible staff member to locate the correct visit.
A required field is missing
When the patient submits, the app should identify the earliest incomplete required field. Scroll to the first field marked with an error and complete it. If the error remains after one correction attempt, capture the field name and exact message for Support. Do not include the patient’s full value in the screenshot.
A section still shows Action Needed
Open the section and review every required field, selection, signature, or upload. Save once, return to the dashboard, and wait for the status to update. Refresh the page once if needed. If the item still does not change, do not create a new patient or check-in. Contact Support with the patient or visit ID, section name, time, device type, and exact visible error.
A photo or insurance image will not upload
Confirm the image is clear and that the device allows camera or photo-library access. Retry once with a newly captured image. Confirm the correct file name or preview appears before saving. If it still fails, stop and contact Support. Do not send the insurance image through an unapproved channel.
The payment is declined or the result is unclear
Read the message to the patient and confirm the selected payment method and displayed amount. Do not keep retrying and do not use another card without the patient’s approval. If the app may already have processed the payment, stop before submitting again. Ask Support to check the earlier attempt using the visit ID, approximate time, amount, and visible message. Never send full card details.
Progress shows 100% but Check-In Complete does not appear
Scroll to the bottom and confirm every section shows a green check. Refresh once and reopen the check-in. Do not start a second session. If the completion message still does not appear, contact Support before telling the patient that check-in is complete.
The screen freezes or closes
Wait briefly, then reopen the same link or session and review which sections remain Done. Retry only the unfinished section. Do not repeat a payment or final submission until the previous result has been checked.
What to Send Support
Send only the information needed to investigate: the patient or visit ID, the section name, approximate time, device and browser type, exact error message, and a cropped screenshot that does not expose unnecessary personal, medical, insurance, or payment information. Never include a password, complete card number, security code, full insurance identifier, or detailed medical history.
Completion Check
The correct patient and visit were used.
Required patient information was reviewed and saved.
Consents were reviewed and completed by the patient or an authorized representative.
Insurance and medical history were completed accurately.
The displayed copay and approved payment method were reviewed with the patient.
Every check-in section shows a green check and Done · Tap to Review.
Check-In Progress shows 100% Completed.
The app shows Check-In Complete and confirms that the visit is registered.
Done was selected and the private session ended or the patient logged out.
No duplicate account, check-in, submission, authorization, or charge was created. If any item cannot be verified, the check-in is not complete. Stop before repeating a submission or payment and contact Support.
Comments (0)